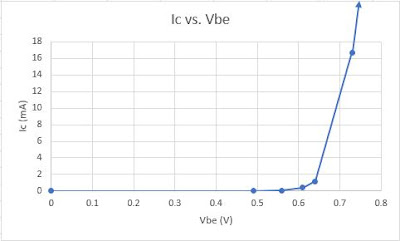
(Table and graph) Use the transistor by itself. The goal is to create the graph for IC (y-axis) versus VBE (x-axis). Connect base and collector. Use 10 KΩ potentiometer to generate the voltage. Use 5V but DO NOT EXCEED 1V for VBE. Make sure you have the required voltage value set before applying it to the base. Transistor might get really hot. Do not TOUCH THE TRANSISTOR! Make sure to get enough data points to graph. (Suggestion: measure for VBE = 0V, 0.5V, and 1V and fill the gaps if necessary by taking extra measurements). The circuit should look like the one below:
 |
| Data table 1: (Base/Emitter voltage) and (Collector Current) |
 |
| Graph 1: Data from table 1, modified to show the trend between Vbe and Ic. Data #'s 7, 8 were removed to show exponential line. |
- For the circuit schematic above, our class decided to discard the 10k Ω potentiometer and instead just adjust the amount voltage manually using the power supply. The recorded data above shows an exponential relationship between the collector and base currents, as soon as the Vbe voltage hits around 0.65 V, you can see its current begins to increase exponentially on a curve. We stopped recording data around 0.8 V so that we didn't burn the transistor out.
 |
| Data Table 2: Shows recorded measurement combinations of Vbe, and Vce set to various voltages to show the different IC outputs. |
 |
| Graph 2: Shows the visual correlations of the data table above, notice how the differing voltages create both linear and exponential lines. |
3. (Table) Apply the following bias voltages and fill out the table. How is IC and IB related? Does your data support your theory?
 |
| Table 3: IC and IB are related because it is the currents flowing through the transistor, equation IE = IC + IB also proves their relationship |
- IC and IB are related by beta (𝛃), 𝛃 = (IC / IB) our table above seems to be somewhat linear, thus we could say "yes, our data supports this theory."
4. (Table) Explain photocell outputs with different light settings. Create a table for the light conditions and photocell resistance.
 |
| Table 4: Shows the amount of resistance is output due to light conditions by the photocell |
- A photocell outputs different resistances based on the amount of light it recieves. The more light it receives, the less amount of resistance is supplied to the circuit. Our data above supports this.
5. (Table) Apply voltage (0 to 5 V with 1 V steps) to DC motor directly and measure the current using the DMM.
 |
| Table 5: Shows the relationship between the voltage and amount of current flowing through the DC motor. |
6. Apply 2 V to the DC motor and measure the current. Repeat this by increasing the load on the DC motor. Slightly pinching the shaft would do the trick.
 |
| Table 6: Shows the amount of pressure applied to the shaft of the motor, and the current being drawn by the motor. |
7. (Video) Create the circuit below (same circuit from week 1). Explain the operation in detail.

 |
| Table 7: Shows that the more voltage and resistance in the transistor, the more current will be in its collector |
- The 47 Ω Resistor acts as a safety net for the transistor, almost like a fuse. It helps prevent any excess current that may come from the power supply. By raising the voltage it proves ohms law, that I = V/R, it starts increasing more
9. (Video) Create your own Rube Goldberg setup.


Wish you had more time to work together on RG.
ReplyDelete